User manual

Table of contents

Introduction

Introduction

Welcome to PixieBooks – your AI-powered companion for processing receipts.
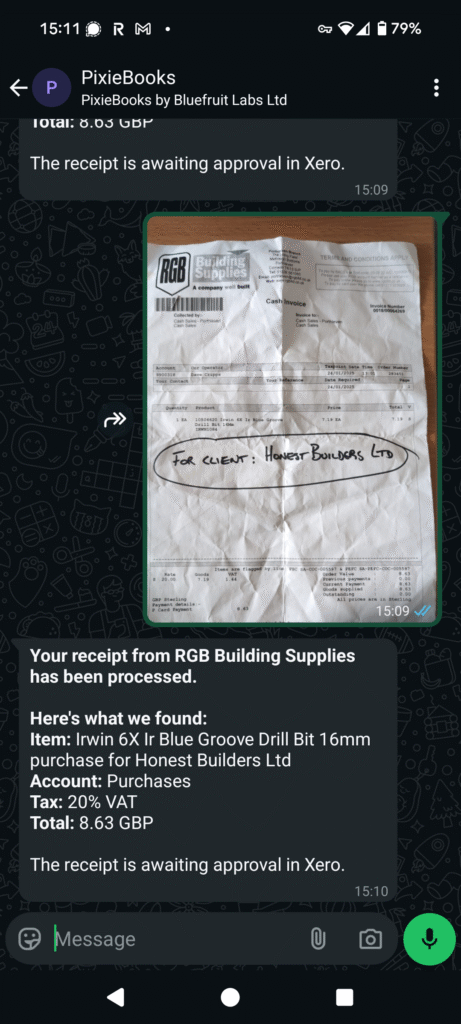
PixieBooks helps you stay on top of your bookkeeping and save time by automatically handling your receipts. Using advanced AI, PixieBooks processes receipts sent via email or WhatsApp and works with Xero to identify item descriptions, amounts, dates, and VAT.

PixieBooks also offers a Google Sheets integration, currently in beta, which allows receipts to be submitted via WhatsApp and stored directly in Google Sheets.

Key features

  • Automatic receipt processing: Capture your receipts and send them to PixieBooks – the AI reads and codes them for you.
  • Smart receipt rules: Create simple, plain-English prompts and PixieBooks automatically applies them to future receipts. Click here to learn more.
  • Integration with Xero: PixieBooks connects directly to your Xero organisation and posts data in the background.
  • VAT detection: VAT amounts are automatically recognised and the appropriate VAT code is applied.
  • Reduced bookkeeping effort: Spend less time coding receipts and more time on higher-value work.

System requirements

  • A Xero account to connect PixieBooks.
  • A Google account to use our Sheets version (beta).
  • A device with WhatsApp installed, so you can send PixieBooks photos of your receipts.
  • A reliable internet connection to send and receive data.
  • Optional: access to email as an alternative way to send receipts.

Permission requirements

Xero

To connect PixieBooks to a Xero organisation, the following permissions are required:

  • Projects → Access set to Standard or Admin
  • Business and accounting → Access set to Advisor or Standard
Google Sheets
  • Personal Google account: No additional permissions are required.
  • Google Workspace account: The account must not be Cloud Identity Free. Storage access is required in order to open and use the PixieBooks template.

Supported platforms

PixieBooks currently integrates with Xero and Google Sheets. Future updates will expand support to additional accounting platforms.

To stay informed about new features and updates, subscribe to our newsletter at
pixiebooks.com/newsletter
or follow us on social media at @pixiebooksbybluefruitlabs.

Getting Started

Send receipts to QuickBooks using PixieBooks for Google Sheets

This guide shows you how to use PixieBooks for Google Sheets alongside QuickBooks — from signing up to importing your receipts.


Step 1: Sign up to PixieBooks for Google Sheets

  1. Go to pixiebooks.com and click Sign In.
  2. Select Sheets.
  3. Log in with your Google account.
  4. Click Continue to connect your Google account.
  5. Click Continue again to connect your Google Drive.
  6. Enter your organisation name, click Add, then click Continue.
  7. Add your phone number to connect WhatsApp.

You’re now ready to start using PixieBooks.


Step 2: Match your Chart of Accounts

Before sending receipts, copy your chart of accounts into PixieBooks so the account names match when you import into QuickBooks.

  1. In QuickBooks, go to Settings > Chart of accounts.
  2. Click Run report, then Export to Google Sheets.
  3. In the exported sheet titled Account List, copy the account names.
  4. Paste them into the Accounts tab in your PixieBooks Google Sheet.

Step 3: Match your suppliers

Next, copy your supplier list into PixieBooks.

  1. In QuickBooks, go to Expenses > Suppliers.
  2. Click Export.
  3. In Google Drive, select New > File upload.
  4. Upload the Suppliers.xls file from your downloads.
  5. Go to My Drive.
  6. Right-click the uploaded file and select Open with > Google Sheets.
  7. Copy the supplier list.
  8. Paste it into the Contacts tab in your PixieBooks Google Sheet.

Step 4: Send receipts

  • Take photos of your receipts.
  • Send them to PixieBooks via WhatsApp.
  • Each receipt will appear automatically in the Receipts tab of your PixieBooks Google Sheet.

Step 5: Import receipts into QuickBooks

Export from Google Sheets
  1. In your PixieBooks Google Sheet, open the Receipts tab.
  2. Click File > Download > CSV.
Import into QuickBooks
  1. In QuickBooks, go to Settings > Tools > Import data.
  2. Select Bills.
  3. Click Browse, upload PixieBooks – Receipts.csv, then click Open.
  4. Tick the confirmation box and click Next.
Column mapping

Match the columns as follows:

  • Bill No → Receipt ID
  • Supplier → Contact Name
  • Bill Date → Date
    • Format → YYYY-M-D
  • Due Date → Due Date
  • Account → Account Name
  • Line Description → Description
  • Line Amount → Total Including VAT
  1. Click Next, then Start import.
  2. Once the import completes, click OK.

Return to Expenses in QuickBooks — you’ll now see all your imported receipts.


Recommended: Avoid duplicate imports

To prevent importing the same receipts more than once:

  1. In your PixieBooks Google Sheet, duplicate the Receipts tab.
  2. Rename the copied tab Filed receipts.
  3. After importing into QuickBooks, cut and paste the imported rows from Receipts into Filed receipts.
  4. Clear the Receipts tab before sending new receipts with PixieBooks.

This keeps your data organised and helps avoid duplicate imports.

Google sheets set up guide

Watch this video (2 mins) to see how easy it is to set up PixieBooks for Google Sheets and send receipts via WhatsApp:

Or follow the steps below:

Step 1: Visit PixieBooks

  • Go to pixiebooks.com and click Sign In.
  • Select Sheets to begin the setup.

Step 2: Connect PixieBooks to Google

  • Log in with your Google account.
  • Click Continue to connect your Google account.
  • Click Continue again to connect your Google Drive.

Step 3: Add Your Organisation

  • Type your organisation name into the field provided.
  • Click Add, then click Continue.

Step 4: Link Your Phone Number

  • Enter your mobile phone number to connect WhatsApp.

Step 5: Send Receipts via WhatsApp

  • Take a picture of your receipt.
  • Send it to PixieBooks on WhatsApp.
  • Wait for the two blue ticks to confirm it’s been received.
  • Moments later, you’ll receive a clear summary of the receipt data, including the automatically selected tax code.

Step 6: Review Receipts in Sheets

  • Log in to docs.google.com/spreadsheets or search for Google Sheets.
  • Open the new spreadsheet called “PixieBooks”.
  • Go to the Receipts tab to view all the bills you’ve submitted.

And that’s it!

Your receipts now flow directly into Google Sheets through PixieBooks — keeping your bookkeeping simple, accurate, and organised.

If you need help at any point, feel free to reach out at [email protected].


Step-by-step: Send receipts to Xero via email

Watch this quick video (2 mins) to see how easy it is to email your receipts and invoices directly into Xero:


Or follow the steps below:

Step 1: Visit PixieBooks

Step 2: Connect PixieBooks to Xero

  • Log in to your Xero account when prompted.
  • Select Allow Access to integrate PixieBooks with Xero.

From your dashboard, you can create smart, plain-English rules for PixieBooks to follow. Click here to learn more.

Step 3: Get Your Xero Email

  • In Xero, go to Purchases > Bills.
  • Click the green New Bill button.
  • Select Copy your forwarding email address.

Step 4: Send Receipts & Invoices

  • Send receipts and invoices to your Xero email address.
  • You can attach multiple receipts or invoices in a single email.

Pro Tip: Forward email invoices you’ve received directly to your Xero bill-entry email — quick and easy.

Step 5: Submission Tips

  • Attach files directly from your computer.
  • Avoid sending cloud storage links — Xero accepts only direct attachments.
  • You can include up to 10 attachments per email.

Step 6: Review Receipts

  • Log in to Xero and go to Business > Bills to Pay.
  • Refresh the page to review your uploaded receipts and invoices.

That’s it! Your receipts and invoices will now flow seamlessly into Xero, making your bookkeeping smoother, faster, and more accurate.

Step-by-Step: Send receipts directly within Xero

Watch this quick video (2 mins) to see how easy it is to upload and manage your bills directly in Xero:


Or follow the steps below:

Step 1: Visit PixieBooks

Step 2: Connect PixieBooks to Xero

  • Log in to your existing Xero account, or create a new one if needed.
  • Click Allow Access to connect PixieBooks and Xero.

From your dashboard, you can create smart, plain-English rules for PixieBooks to follow. Click here to learn more.

Step 3: Open Xero Bills

  • Open Xero.
  • Navigate to Purchases > Bills.

Step 4: Upload Your Bills

  • Click the green New Bill button.
  • Select Upload Bills.
  • Choose files from your computer, or simply drag and drop them onto the screen.

Pro Tip: Keep your receipts and invoices organised in a single folder — it makes batch uploads much quicker.

Step 5: Confirming Your Bills

  • Refresh the page to view and confirm your uploaded bills.

You’re all set! Managing your bills in Xero is now simple, fast, and fully streamlined.

Step-by-step: Send receipts to Xero with WhatsApp

Watch this quick video (2 mins) to see how easy it is to send your receipts directly to Xero using WhatsApp:


Or follow the steps below:

Step 1: Visit PixieBooks

Step 2: Connect PixieBooks to Xero

  • Log in to your existing Xero account, or create a new one if needed.
  • Click Allow Access to connect PixieBooks and Xero.

From your dashboard, you can create smart, plain-English rules for PixieBooks to follow. Click here to learn more.

Step 3: Link Your Phone Number

  • Enter your mobile phone number to link your WhatsApp account.

Step 4: Send Receipts via WhatsApp

  • Send your receipts directly through WhatsApp to PixieBooks.
  • Look for two blue ticks indicating successful receipt.
  • You’ll receive a confirmation message for each submission.

Pro Tip: Submit receipts while you’re still in the shop — WhatsApp makes it instant.

Step 5: Confirm Receipts in Xero

  • Open Xero and go to Purchases > Bills.
  • Refresh the page to see your uploaded receipts.

That’s it! Your bookkeeping is now simpler, quicker, and fully integrated between WhatsApp and Xero.

Tips and Tricks

Send receipts to QuickBooks using PixieBooks for Google Sheets

Manage multiple organisations from one PixieBooks dashboard

If you use more than one Xero account, switching between them can quickly become frustrating — especially if PixieBooks is set up on organisations across both accounts.

Watch this video (2 mins) to see how to bring all your organisations into one PixieBooks dashboard, so you can manage everything in one place without constantly logging in and out:

Or follow the steps below:


Step 1: Log in to your first Xero account

Log in to one of your Xero accounts — we’ll call this Account A.

  • In Xero, open the organisation dropdown in the top left.
  • Click Settings, then select Users.

Here you’ll see everyone who has access to this organisation.


Step 2: Invite your other Xero account

  • Click Invite a user.
  • Enter the email address used by your other Xero account (we’ll call this Account B).

Now set the permissions carefully — this part is important.

Required permissions

Make sure both of the following are selected:

  • Projects → Access set to Standard or Admin
  • Business and accounting → Access set to Advisor or Standard

Important:
If either of these permissions are missing, the organisation will be greyed out and marked “More permission required” when you try to connect it.

Once everything is set, click Send invite.

If Account A has multiple organisations, repeat these steps for each one.


Step 3: Accept the invitations

Check the inbox for Account B.

You’ll receive one email for each organisation you were invited to. Open each email and click
Accept invitation.


Step 4: Connect the organisations in PixieBooks

Now:

  1. Log out of xero.com.
  2. Log out of app.pixiebooks.com (if it is open in your browser).

(Do this in that order.)

Next:

  • Go to app.pixiebooks.com and log in using Account B.
  • Click Connect organisation.
  • Select the organisation from Account A and click Allow access.

Repeat this step for each organisation you want to connect.


All done

You’ll now see all your organisations in a single PixieBooks dashboard, with access to connected
phone numbers and receipt rules in one place.

Recommended:
For maximum flexibility, repeat this process in reverse — log into Account B on Xero and invite Account A to each organisation.

That way, no matter which Xero account you sign in with, you’ll always be able to access all your organisations in PixieBooks.

Chart of Accounts

When you start using PixieBooks, you might notice that bills are sometimes assigned to the wrong account. For example, a receipt you wanted to be submitted to Motor Travel might instead be allocated to Motor Vehicles.

This happens because PixieBooks automatically assigns bills to the account it thinks is most relevant. In Xero, there’s a pre-set chart of general accounts designed to cover the most common expenses. The problem arises when two accounts have similar names or purposes — PixieBooks may choose the wrong one.

To resolve it , watch this video or follow the instructions below:

How to resolve it

  • If the incorrect account is one you don’t use, archive it so it’s no longer available for allocation.
  • If the account is one you do use, rename the two similar accounts to something more specific. This helps PixieBooks distinguish between them and reduces the chance of future mix-ups.

How to find and update your chart of accounts in Xero

  1. Go to xero.com and log in.
  2. Navigate to Accounting > Chart of accounts.
  3. To archive an account, tick the box next to it, then at the top of the chart click Archive (next to the red Delete button).

PixieBooks Prompts


PixieBooks Prompts allows you to create simple, plain-English rules for how different receipts should be handled.

To add a rule, in the PixieBooks dashboard just click Add Rule, type what you want to happen, and click Save Rule.

For example:

“Phone bills go under Subscriptions.
Additional phone bill costs go under Telephone & Internet.”

Now, next time a phone bill comes in, PixieBooks will automatically apply this rule — sending phone bills to Subscriptions and any extra charges straight to Telephone & Internet.

And that’s it! Smart, simple automation built right into PixieBooks — keeping your bookkeeping consistent with minimal effort.


Need ideas for rules?

Here are a few examples to help you get started:


Receipts from your local coffee shop could be recognised under your refreshments tax code. For example:

  • Coffee purchased from Copperhouse Coffee is categorised as Refreshments.
  • Coffee from other venues falls under Drawings.

Where a supplier payment exceeds a certain value, it may need to be capitalised. For example:

  • Items from Currys PC World totalling more than £500 should be posted to IT Equipment.
  • Items totalling less than £500 should be posted to Computer Expenses.

Some suppliers charge both monthly subscription fees and pay-as-you-go usage, where each needs a different code. For example:

  • If the Vodafone invoice line refers to the subscription (“subscription”, “monthly plan”, “membership”), post it to Software Subscriptions.
  • If the invoice line refers to usage (“usage”, “pay as you go”, “top-up”, “extra units”), post it to Usage-Based Charges.

Have a play around! See what PixieBooks is capable of and how you can make your life just that little bit easier!

Top Tip: Add handwritten notes to receipts for extra context

Write PixieBooks a note

Did you know PixieBooks can read and interpret handwritten notes added to your receipts?

This smart feature can be a game-changer for capturing extra details that aren’t printed on the receipt — helping your bookkeeping stay accurate, compliant, and context-rich.

How It Works

When you snap a photo of a receipt using WhatsApp, PixieBooks automatically scans the image and reads both the printed text and any clear handwritten notes. In more complex receipts, you may need to draw attention to your note, by circling underlining it.

A WhatsApp phone chat with PixieBooks shows that a photo of a receipt has been sent by the user. It contains a handwritten note: 'For client: Honest Builders Ltd'. A message has been returned showing the receipt values, tax code, and mentions client, Honest Builders Ltd.

Use It To:

  • Clarify VAT context: e.g. “Takeaway” vs “Eat in” – useful if the receipt doesn’t specify.
  • Tag client expenses: Write “Lunch with Client: ABC Ltd” to make client-specific costs crystal clear.
  • Fill in missing details: If the receipt is torn or faded, jot down the missing item or amount before snapping it.

Why It Matters

Accountants and bookkeepers benefit from better context, more accurate categorisation, and fewer follow-up questions. That means less admin for you — and cleaner books for your business.

Any tips?

If you have your own PixieBooks tip you’d like to share, let us know – we’d love to hear them!

Troubleshooting

Troubleshooting steps

If you’re running into any issues with PixieBooks, here’s a quick walkthrough of the steps we’ll normally ask you to try first.

Watch this video (2 mins), or follow the instructions below:

Step 1 — Check your permissions in Xero

Go to xero.com, open the organisation dropdown, and go to Settings → Users.

Once you’re on the Users page, take note of your access level:

  • If you can’t view the Users page at all, your role is Read only or Invoice only.
  • If you can see the Users page, note whether your role is Advisor or Standard.
  • Also check whether you’re able to click into your own profile and make changes — that helps confirm your exact permission level.

Step 2 — Fully disconnect and reconnect

Head to your PixieBooks dashboard at app.pixiebooks.com.

  1. Disconnect your phone number.
  2. Disconnect your organisation.
  3. Next, go to xero.com.
    Open the organisation dropdown, then go to Settings → Connected apps.

    If you discovered in Step 1 that your access level is Read only or Invoice only, you won’t be able to access this page — so just skip this part.

    • You should no longer see PixieBooks listed here.
    • If you do still see it, just disconnect it from this page.
  4. Return to app.pixiebooks.com, refresh the page, and click Connect Organisation to reconnect everything.
  5. Once that’s done, re-add your phone number.
  6. Finally, go back to your Xero tab in Connected apps, and refresh the page — you should see PixieBooks listed there again.

If after disconnecting and reconnecting you’re still having trouble, contact us at [email protected]. Send us a short description of the issue and your Xero access level, and we’ll take it from there.

This number’s already in use

PixieBooks only allows one phone number to be connected to one organisation at a time. If you try to add your phone number and see an error saying “This number’s already in use”, check your PixieBooks dashboard to see which organisation it’s connected to.

If you can’t see it on your dashboard, one of these is usually true:

A) It’s a bug

Follow the steps in our troubleshooting guide to disconnect and reconnect.

B) You’re signed into a different Xero account

If you have more than one Xero account, your phone number may be connected under the other account’s organisations.

A quick way to check: if you’ve submitted receipts via WhatsApp before, open your PixieBooks WhatsApp chat and scroll to the very top. In the welcome message, you should see the organisation name and the email address managing it.

To switch Xero accounts:

  1. Log out of your PixieBooks dashboard.
  2. Go to xero.com and log out there too (as cache can get in the way).
  3. Return to PixieBooks and sign in with your other Xero account.
  4. Connect the organisation (if needed), then disconnect your phone number from the organisation it’s currently linked to.

If you manage multiple Xero accounts and want to access all your organisations from one PixieBooks dashboard, see our tips & tricks guide.

Still having trouble with your number? Reach out to us at [email protected] and include as much detail as possible about what went wrong and what steps you’ve already tried.

Something went wrong when adding your phone number

This issue can occur when you’re creating a new organisation in PixieBooks and your phone number is still connected to a different organisation.


Why this happens

A phone number can only be linked to one PixieBooks organisation at a time.

If you try to add your phone number while it’s still connected to another organisation, PixieBooks won’t be able to complete the setup. When this happens, you may be taken to a “Something went wrong” page.


What to do instead

If your phone number is already connected to another organisation:

  1. When you reach the Add your number step, skip this step for now.
  2. Complete the rest of the setup without adding your phone number.

You can add your phone number later once it’s been removed from the other organisation.


How to get back to your dashboard

If you’re taken to the “Something went wrong” page:

  1. Open a new browser tab.
  2. Go to app.pixiebooks.com.
  3. You’ll be taken directly to your PixieBooks dashboard.

From there, you can manage your organisations and phone number connections.


Need to move your phone number?

To use the same phone number with a new organisation, first remove it from the existing organisation in your PixieBooks dashboard. Once it’s been disconnected, you’ll be able to add it to the new organisation without any issues.

Can’t create an organisation in PixieBooks for Google Sheets

Some users may run into an issue when using PixieBooks for Google Sheets with a Google Workspace Cloud Identity Free (CIF) account.


What’s happening

Workspace Cloud Identity Free does not include Google Drive storage.

While CIF accounts can create new documents in Google apps like Sheets and Docs (which are stored locally), they can’t open shared templates or documents that rely on Google Drive.

PixieBooks for Google Sheets uses a shared Google Sheet stored in Drive, so on CIF accounts the PixieBooks spreadsheet won’t open.


Why this affects PixieBooks

The PixieBooks Google Sheets file is a shared document hosted in Google Drive.

Because CIF accounts don’t have Drive storage, Google blocks access to that shared file — even though Google Sheets itself is available.


Current workarounds

At the moment, there are two options:

Option 1: Use a personal Gmail account
This allows the PixieBooks Google Sheet to open correctly. However, we understand this may not be ideal from a confidentiality or data-handling perspective.

Option 2: Use a paid Google Workspace account
Any Google Workspace plan that includes Drive storage will resolve the issue.

The goal of PixieBooks for Google Sheets is to remain free and accessible, so requiring a paid Workspace account isn’t the intended solution.

Manage subscription 404 error

When you click on Manage subscription in the PixieBooks dashboard, you will be taken to Xero, where you may find a 404 error.

If this occurs, simply return to the PixieBooks dashboard and click on Manage subscription again.

FAQs

How can I see if a receipt has been submitted?

When a receipt is submitted successfully, WhatsApp will show two blue ticks (✓✓), confirming PixieBooks has received it.

You can also confirm submission by checking Xero. Any successfully processed receipts will appear as bills under
Purchases > Bills > Awaiting Approval.

If a receipt doesn’t appear, it may still be processing or may require review. Refresh Xero or check the WhatsApp confirmation message for details.

When and how does data sync occur?

Data syncing happens automatically whenever a receipt is submitted to PixieBooks.

As soon as a receipt is received via WhatsApp or email, PixieBooks processes it and creates a bill in Xero under
Awaiting Approval.

There’s no manual sync button and no additional setup required. If a bill doesn’t appear straight away, refresh Xero and allow a short period for processing.

How can I see what transactions have been processed by PixieBooks?

PixieBooks shows receipt activity in real time.

Open WhatsApp and go to your PixieBooks chat to see confirmation messages for each receipt you’ve sent. Each message reflects the current processing status.

You can also view processed receipts directly in Xero. Submitted receipts will appear as bills under
Purchases > Bills > Awaiting Approval.

How do payment processing fees appear in Xero?

Payment processing fees are handled within Xero and may appear as separate line items or adjustments, depending on your organisation’s setup and accounting preferences.

PixieBooks does not alter how these fees are recorded — it simply submits receipt data into Xero for review.

If you’re unsure how fees should be treated in your accounts, we recommend checking with your accountant or bookkeeper for advice specific to your setup.

How do I disconnect from Xero?

You can disconnect PixieBooks from Xero directly from your PixieBooks dashboard.

Sign in at app.pixiebooks.com, locate the organisation you want to manage, and select Disconnect from Xero. You’ll be asked to confirm before the connection is removed.

If you’re unable to find the disconnect option, or the connection doesn’t remove as expected, contact us at
[email protected] and we’ll help you resolve it.

I don’t have the correct permissions to connect my Xero organisation

If you can log into your business’s Xero account but don’t have the permissions required to connect your organisation to PixieBooks, you’ll need to ask your Xero account administrator to complete the first part of the setup.

Once they’ve connected the Xero account and selected your organisation, you’ll need to ask them to either:

Once PixieBooks is connected to your organisation, you’ll be able to log into the PixieBooks dashboard with your Xero account at app.pixiebooks.com to view your account and manage your subscription.

Send this link to your accountant or organisation administrator so they can read the step-by-step instructions or follow along with the video:

PixieBooks for Xero set up guides

What if I don’t have access to my Xero account?

If you don’t have access to your Xero account, you can still use PixieBooks, but you won’t be able to set up or manage the connection yourself.

You’ll need to ask your accountant or Xero organisation administrator to either:

Send this link to your accountant or organisation administrator so they can read the step-by-step instructions or follow along with the video:

PixieBooks for Xero set up guides

Can I cancel my subscription? 

Yes. If you’re unhappy with PixieBooks for any reason, you can cancel your subscription via the PixieBooks dashboard.

  1. Sign in at app.pixiebooks.com.
  2. Click Manage subscription.
  3. If you subscribed before we moved to Stripe, you’ll be taken to Xero, where you can cancel your subscription.
    If you subscribed after the move to Stripe, you’ll be taken to Stripe, where you can manage your subscription.

Do I need a Xero account to use PixieBooks? 

If you’re using PixieBooks for Xero, then yes — PixieBooks connects directly to your Xero account, so access to this account is required.

If you don’t have access to your Xero account, ask your accountant to set up PixieBooks for you. If you’re unsure whether your accounts are handled on Xero, your accountant will be able to confirm.

Don’t use Xero? You can still use PixieBooks with Google Sheets.
Learn more about PixieBooks for Google Sheets.

What accounting software is PixieBooks compatible with?

PixieBooks integrates directly with Xero and Google Sheets.

If you’re using another accounting platform, you can export your data via Google Sheets and import it into your accounting software. You may need to format the data to match your software’s import requirements. Support for additional direct integrations may be added in the future.

Something went wrong when adding your phone number

This issue can occur when you’re creating a new organisation in PixieBooks and your phone number is still connected to a different organisation.

Why this happens

A phone number can only be linked to one PixieBooks organisation at a time.

If you create a new organisation using a different Xero account and try to add your phone number before removing it from the previous organisation, PixieBooks won’t be able to complete the setup. When this happens, you may be taken to a “Something went wrong” page.

What to do instead

If your phone number is already connected to another organisation:

  1. When you reach the Add your number step, skip this step for now.
  2. Complete the rest of the setup without adding your phone number.

You can add your phone number later once it’s been removed from the other organisation.

How to get back to your dashboard

If you’re taken to the “Something went wrong” page:

  1. Open a new browser tab.
  2. Go to app.pixiebooks.com.
  3. You’ll be taken directly to your PixieBooks dashboard.

From there, you can manage your organisations and phone number connections.

Need to move your phone number?

To use the same phone number with a new organisation, first remove it from the existing organisation in your PixieBooks dashboard. Once it’s been disconnected, you’ll be able to add it to the new organisation without any issues.

Contacting support 

If you encounter issues that cannot be resolved through the troubleshooting guide or would like to report a PixieBooks error, please fill out the form or send us an email at [email protected]